Pages

Thursday 28 June 2012

DIY Colourful Headphones

All you need are some colourful embroidery threads 

Make a knot at the top of your headphones

Begin twisting the thread tightly around the wires


To change colours  tie a knot at the end of the thread
and repeat step 1 


Continue this for the rest of the head phones and
your done!

Tuesday 19 June 2012

DIY Peter pan collar

Print off a peter pan collar template.

Cut it so that the size fits you neck

Pin it down onto a piece of felt

Then cut it out

Next you will need some lace


Cut roughly around the collar

Use fabric glue to stick a the lace and the felt together

Turn over to the back and glue down the edges

Finally punch two holes at the top and put a piece of lace
through each  side to tie it and you'r done  


Friday 15 June 2012

Fridays Fashion Favorites


Denim Shirts
Black heeled boots
Inglot nail polish #727
vintage satchel bags
Cross rings
Sheer high-low skirts
vintage high-waisted shorts


Monday 11 June 2012

7 Make-up tricks

So instead of doing the usual DIY projects, today I decided to share some of my make-up tips and tricks you probably know some of them already but I hope this helps anyways :)


1: foundation
You should  use a foundation that matches the colour of the skin on your neck/chin.


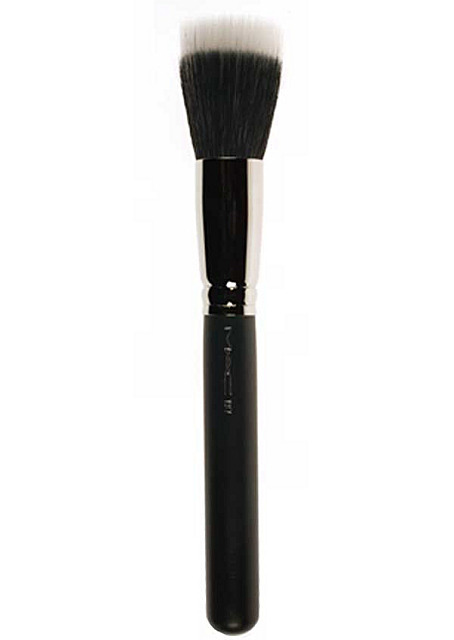
Use a stippling brush when applying foundation to give and air-brushed effect.


Foundations with a high SPF (above15) in
them will make you skin look shiny in photos


2:Highlighting and contouring
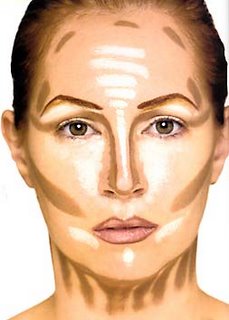
Use bronzer under you cheek bones and a light shimmer powder on the top to give the effect of higher, more defined cheek bones.


You can also highlight the bridge of your nose and contour the side to change the shape of it.


3: Eyebrows
When plucking your eyebrows mark off the shape you want with a white eyeliner and pluck away any hairs outside of the mark.


Place a warm/hot face cloth over you eyebrows before plucking
to open the pores so that the hair will come out easier and will be less painful.


4: Eye-shadow & Eyeliner
Use a neutral colour on the lid, a medium colour on the
crease and a darker color on the outer corner of your eye.


Use a white eyeliner on your waterline and a black eyeliner
close to you lashes on the top to open your eyes and
make them look bigger.


5: Mascara
Don't pump your mascara wand in the tube because this will dry
out you mascara.

Roll the mascara wand through your lashes to coat all of them giving you fuller lashes.

Keep your favorite mascara wands and use them with other mascaras.


6: Lips
Use a lip liner to outline slightly outside of you lips to make them look fuller.


Use some bronzer to create a slight shadow under your
bottom lips to make them look fuller.
Apply lighter lip colours and glosses to the center of your lips to give the effect of bigger lips.


Sunday 10 June 2012

DIY printed tops

So I recently found out that you can create prints on old tops by using toilet bleach. This was my first attempt so it didn't turn out too good but it was still pretty easy. Hope you enjoy:)


What you need:
Old dark T-shirt
Toilet bleach
thick cardboard (or anything to stop the bleach soaking through the top)
Spray bottle
Masking tape


Step 1
Mask off the shape of the design you want ( I recommend covering off the rest of the T-Shirt as well because the bleach gets every where when you spray, I made this mistake!)


Step 2
Place the cardboard inside the t-shirt to stop the bleach soaking through


Step 3
Pour the bleach into whatever bottle or container you have


Step 4
spray where you have marked out your design


Step 5
wait a few minuets for it to dry then peel off the masking tape and rinse it


And you'r done! the design wont come out in the wash or run. but the colour will change as it drys
Hope you liked it:)